Project settings
Project Settings change files in the project itself, in assets/config, so they ship with the game and apply to everyone who works on it. This page covers the Game page (title, start scene, window, renderer, view, timing and loading screen), the Input page (actions and their bindings), the Physics page (gravity, layer names and which layers collide), and the file each page writes.
Open Project Settings with Edit › Project Settings… (CtrlShift,). Changes are kept in the dialog until you click Save; the footer reads Unsaved changes in between, Revert discards them, and closing the dialog with changes asks whether to save them. Play mode and builds use the saved settings from then on.
Game
The Game page writes config/game.json.
| Setting | Default | What it does |
|---|---|---|
| Title | The project's name | The window title and the name of exported executables |
| Start scene | scenes/main.tscene | The scene the game opens with |
| Window size | 1280 × 720 | The window's size when the game starts, in pixels |
| Renderer | Automatic | Automatic uses Vulkan where the graphics card supports it and Skia elsewhere. Vulkan and Skia force one. |
| Texture filter | Nearest in the platformer and hex templates | Nearest keeps pixel art crisp; Linear smooths scaled images. Textures whose import settings choose Game default follow it. |
| Clear color | The template's background | Behind everything, when a scene sets no background of its own |
| Fixed update rate | 60 per second | How many physics and FixedUpdate steps run per second, from 10 to 480 |
| Most fixed steps per frame | 5 | A cap that keeps a slow frame from running too many catch-up steps |
| VSync | on | One frame per display refresh |
| Frame cap | 0 | The most frames per second; 0 is no limit |
| Pause when inactive | on | Stops game time while the game's window is in the background |
View
The View section keeps what players see the same on every screen: a larger window shows the game larger, not more of the world. It writes the view section of game.json.
| Setting | Default | What it does |
|---|---|---|
| Scale mode | Expand, or Fit in the platformer template | How the design size fills the window. The description under the name explains the mode you pick. |
| Design size | 1280 × 720, or 640 × 360 in the platformer template | What a camera at zoom 1 shows, in view units. Overlays lay out in the same units unless they have an overlay size. |
| Integer scale | off, or on in the platformer template | Scales by whole numbers only, which keeps pixel art crisp. With Fit, the pixels left over become bars. |
| Overlay size | off, or 1280 × 720 in the platformer template | The size HUDs and menus are designed for. Tick the box to use it: overlays then scale with the view, so UI made at 1280 × 720 has the same size relative to a 640 × 360 game. Ignored when the scale mode is Off. |
| Border color | black | The bars around the view. Only Fit draws bars. |
| Scale mode | Every window shows |
|---|---|
| Fit | Exactly the design size, as large as fits. Bars fill the rest of the window. |
| Expand | At least the design size, and more of the world along the window's longer side. No bars. |
| Crop | At most the design size, filling the window and cutting off the longer side. |
| Off | No scaling. A larger window shows more of the world, as in games without a view section. |
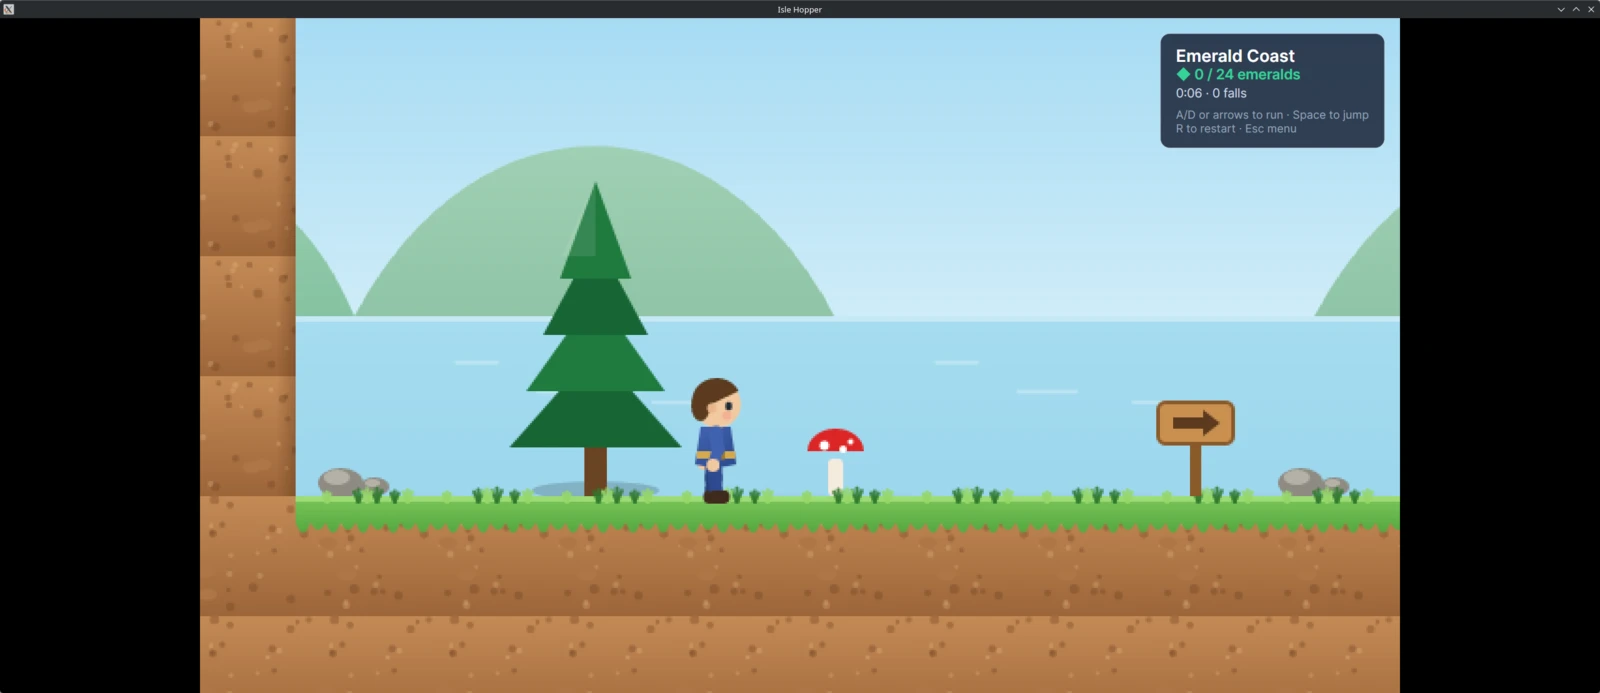
In a 2560 × 1080 window, Isle Hopper's 640 × 360 design with Fit and Integer scale is drawn at 3×, and bars fill the sides:
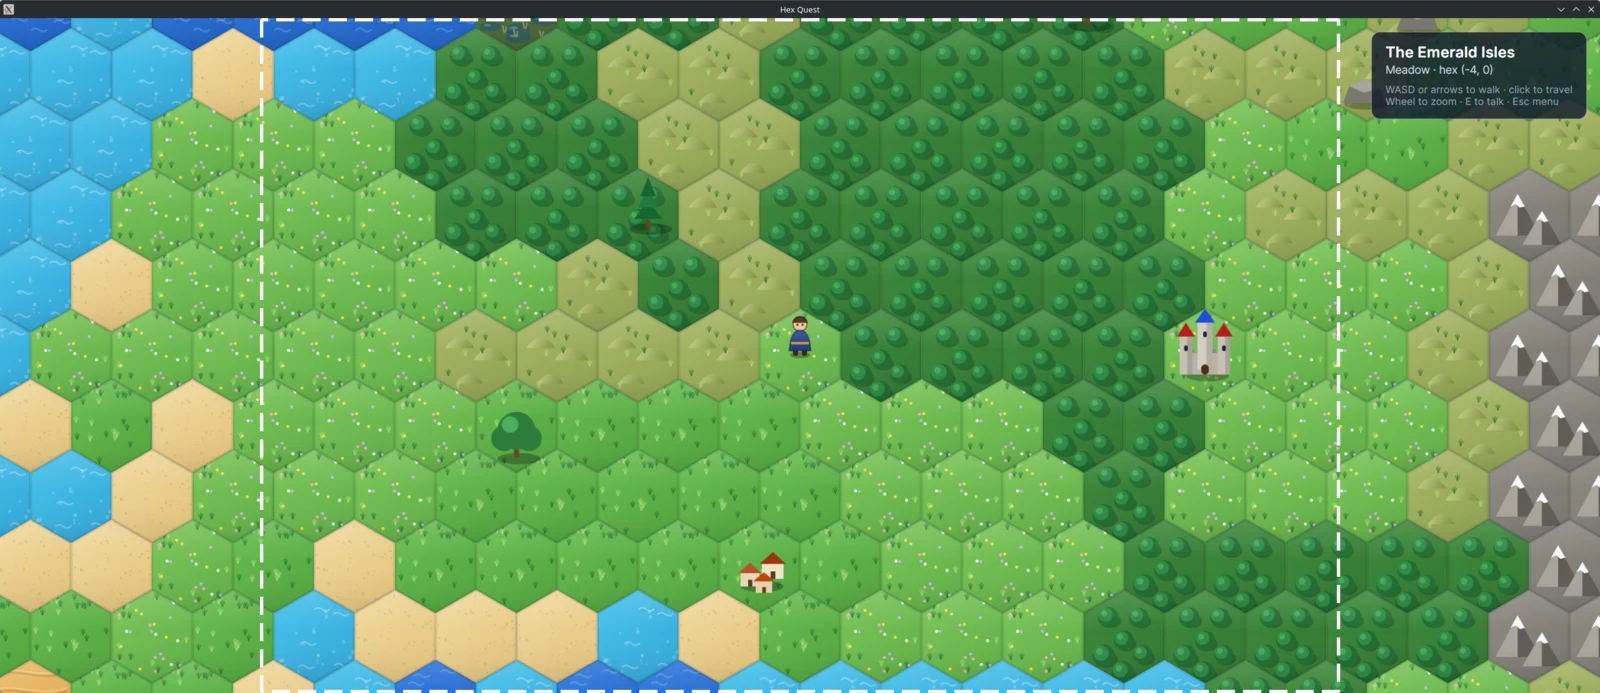
Hex Quest uses Expand with a 1280 × 800 design size. The same window shows the design size, marked here with a dashed frame, and more of the map on both sides:
Under the settings, a sentence says what the game's Window size shows, such as A 1280×720 window shows 640×360 units at 2×., followed by the overlays' area and scale when there is an overlay size, such as Overlays lay out in 1280×720 units at 1×. A design size or overlay size of 0 is reported in red and cannot be saved.
For pixel art, pick a design size that divides common screens: 640 × 360 scales by whole numbers at 1280 × 720 (2×), 1920 × 1080 (3×), 2560 × 1440 (4×) and 3840 × 2160 (6×). Turn on Integer scale, set Texture filter to Nearest, keep cameras at zoom 1 and turn on their Pixel Snap. At a whole-number scale every pixel of the art covers the same number of screen pixels; at 2.5×, nearest filtering makes some of them 2 screen pixels wide and others 3, so edges look uneven:

The camera gizmo in the Scene panel draws the area the game shows at the camera's zoom. For Expand and Crop, a fainter dashed rectangle shows what the window size shows. Play mode lays the game out like a window the size of the Game panel, bars included.
Loading screen
A game's window opens on its loading screen and keeps it until the start scene is on screen: the game's title on its clear color, or an image you choose, above a bar that fills as the scene's assets load. When a later scene change takes more than a moment, the loading screen comes back once the old scene has faded out. Play mode shows the same loading screen in the Game panel, and if the game cannot start, the loading screen says why.
| Setting | Default | What it does |
|---|---|---|
| Image | None | An image from the project, such as the game's logo, shown in the middle. It is scaled to fit most of the window, by whole steps when the texture filter is Nearest, so pixel art stays crisp. With None, the game's title is shown. |
| Background | The clear color | The color behind the image or the title. Tick Own color to pick another. |
| Title and bar | White or near-black | The color of the title and the progress bar. Without Own color, the one that stands out on the background is used. |
| Between scenes | on | Shows the loading screen when a scene change is still loading 0.4 seconds after the old scene has faded out. Turn it off when the game shows its own progress, such as a tip screen. |
The preview at the top of the section shows the loading screen as a 1280 × 720 window would. Builds ship the image with the game; if it is missing, the build log has a warning and the game shows its title instead.
Input
The Input page writes config/input.json. Games read input through actions such as Jump or Move rather than particular keys, so players can rebind them and one action can have several keys.
| Kind | Value | For |
|---|---|---|
| Button | On or off | Jump, interact, open the menu |
| Axis | From -1 to 1 | Running left and right, zooming |
| Vector | A direction | Moving in two dimensions |
- Click + next to Actions to add an action, and type its name, such as
Dash. - Choose its kind: Button, Axis or Vector.
- Click Add binding and choose what triggers it: Key, Mouse button, Axis (two keys) with a negative and a positive key, or Vector (four keys) for up, left, down and right.
- Click a key slot and press the key. It reads Press a key… while it records; Escape cancels. Ctrl, Alt and Shift held with the key become part of the binding.
- Click Save.
Any binding of an action triggers it. Scripts read actions by name: Input.WasPressed("Jump") for buttons, Input.Axis("Run") for axes and Input.Vector("Move") for vectors. See Input in the scripting section.
The trash button removes an action, and × removes a binding. The refresh button next to Actions discards your changes and reads input.json again. Every action needs a name, and two actions cannot share one.
The templates start with actions of their own: the platformer has Run, Jump and Menu, the hex adventure Move, Interact and Menu. See The project hub.
Physics
The Physics page writes config/physics.json.
| Setting | What it does |
|---|---|
| Default gravity | World units per second squared, Y down, 0, 980 by default. New scenes start with it, and each scene can change it in its settings. |
| Layer names | Names for the 32 collision layers, such as Player, Enemies or Pickups. Colliders choose their layer by name in the Inspector. Show all 32 layers lists all of them; otherwise the list shows the named layers and the next free one. |
| Collision matrix | A checkbox for every pair of layers. Untick a pair to let its colliders pass through each other, such as two players, or enemies and triggers meant for the player. |
Each collider also has a Collision Mask, the layers it collides with; two colliders collide only when both masks and the matrix allow it.
Build and Plugins
The Build page opens the Build dialog, whose settings are saved in build.json in the project folder. The Plugins page opens the Plugins panel, which writes config/plugins.json.
The files
Every setting is stored as readable JSON, so you can review changes in version control. See Project configuration for the formats.
| File | Page |
|---|---|
assets/config/game.json | Game |
assets/config/input.json | Input |
assets/config/physics.json | Physics |
assets/config/plugins.json | The Plugins panel |
build.json | The Build dialog |
Related
- Editor settings, for preferences that are not part of the game
- Exporting a game